# Notes
# JDBC
# Using PreparedStatement
PreparedStatement is a subclass of Statement that allows you to pass arguments to a precompiled SQL statement.
double value = 100_000.00; | |
String query = "SELECT * FROM Employee WHERE Salary > ?"; // Parameter for substitution | |
PreparedStatement pStmt = con.prepareStatement(query); | |
pStmt.setDouble(1, value); // Substitutes value for the first parameter in the prepared statement. | |
ResultSet rs = pStmt.executeQuery(); |
- In this code fragment, a prepared statement returns all columns of all rows whose salary is greater than $100,000.
PreparedStatementis useful when you have a SQL statements that you are going to execute multiple times.
# Situation
- You are repeatedly executing query or update where format stays consistent, but values change
您正在重复执行查询或更新,格式保持一致,但值改变的地方 - You can make a parameterized query or update, then pass in values for the placeholders
您可以进行参数化查询或更新,然后传递占位符的值
# Advantages
- More convenient than string concatenation
比字符串连接更方便 - Significantly faster with most drivers and databases
在大多数驱动程序和数据库下,速度显著提高 - If values contain user data, much less susceptible to SQL injection attacks
如果值为用户输入,则更不容易受到 SQL 注入攻击

# Using CallableStatement
A CallableStatement allows non-SQL statements (such as stored procedures) to be executed against the database.
CallableStatement cStmt = con.prepareCall("{CALL EmplAgeCount (?, ?)}"); | |
int age = 50; | |
cStmt.setInt (1, age); // The IN parameter is passed in to the stored procedure. | |
ResultSet rs = cStmt.executeQuery(); | |
cStmt.registerOutParameter(2, Types.INTEGER); | |
boolean result = cStmt.execute(); | |
int count = cStmt.getInt(2); // The OUT parameter is returned from the stored procedure. | |
System.out.println("There are " + count + | |
" Employees over the age of " + age); |
- Stored procedures are executed on the database.
# Transaction 事务
# What is a Transaction?
A transaction is a mechanism to handle groups of operations as though they were one.
事务是一种处理一组操作的机制。Either all operations in a transaction occur or none occur at all.
事务中的所有操作都发生了,或者根本没有发生。The operations involved in a transaction might rely on one or more databases.
事务中涉及的操作可能依赖于一个或多个数据库。
# ACID Properties of a Transaction 事务的 ACID 属性
A transaction is formally defined by the set of properties that is known by the acronym ACID.
事务由 ACID 属性集定义。
- Atomicity 原子性
- A transaction is done or undone completely. In the event of a failure, all operations and procedures are undone, and all data rolls back to its previous state.
事务全部完成或全部撤消。发生故障时,所有操作和过程都将被撤消,并且所有数据都会回滚到以前的状态。 - Consistency 一致性
- A transaction transforms a system from one consistent state to another consistent state.
事务将系统从一个一致状态转换为另一个一致状态。 - Isolation 隔离性
- Each transaction occurs independently of other transactions that occur at the same time.
同时发生的事务相互独立。 - Durability 耐久性
- Completed transactions remain permanent,even during system failure.
即使在系统故障期间,已完成的事务也将保持永久不变。

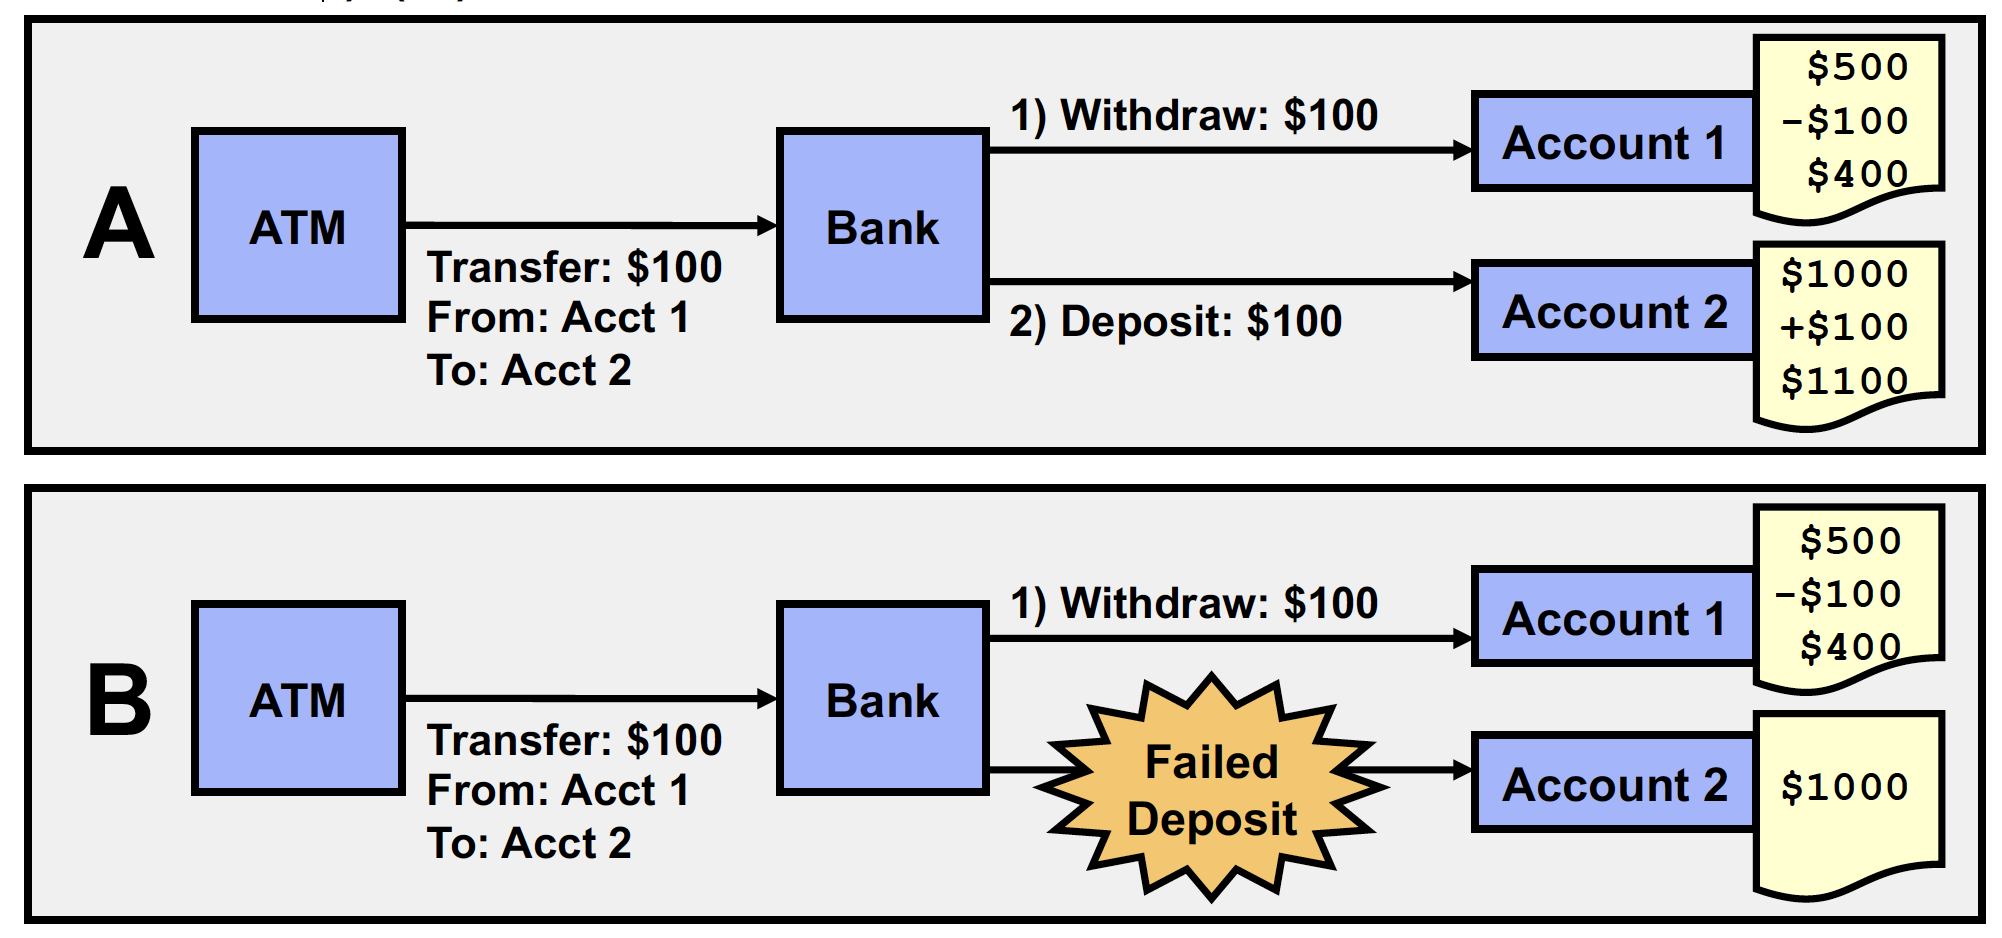
A - Successful transfer
B - Unsuccessful transfer (Accounts are left in an inconsistent state.)

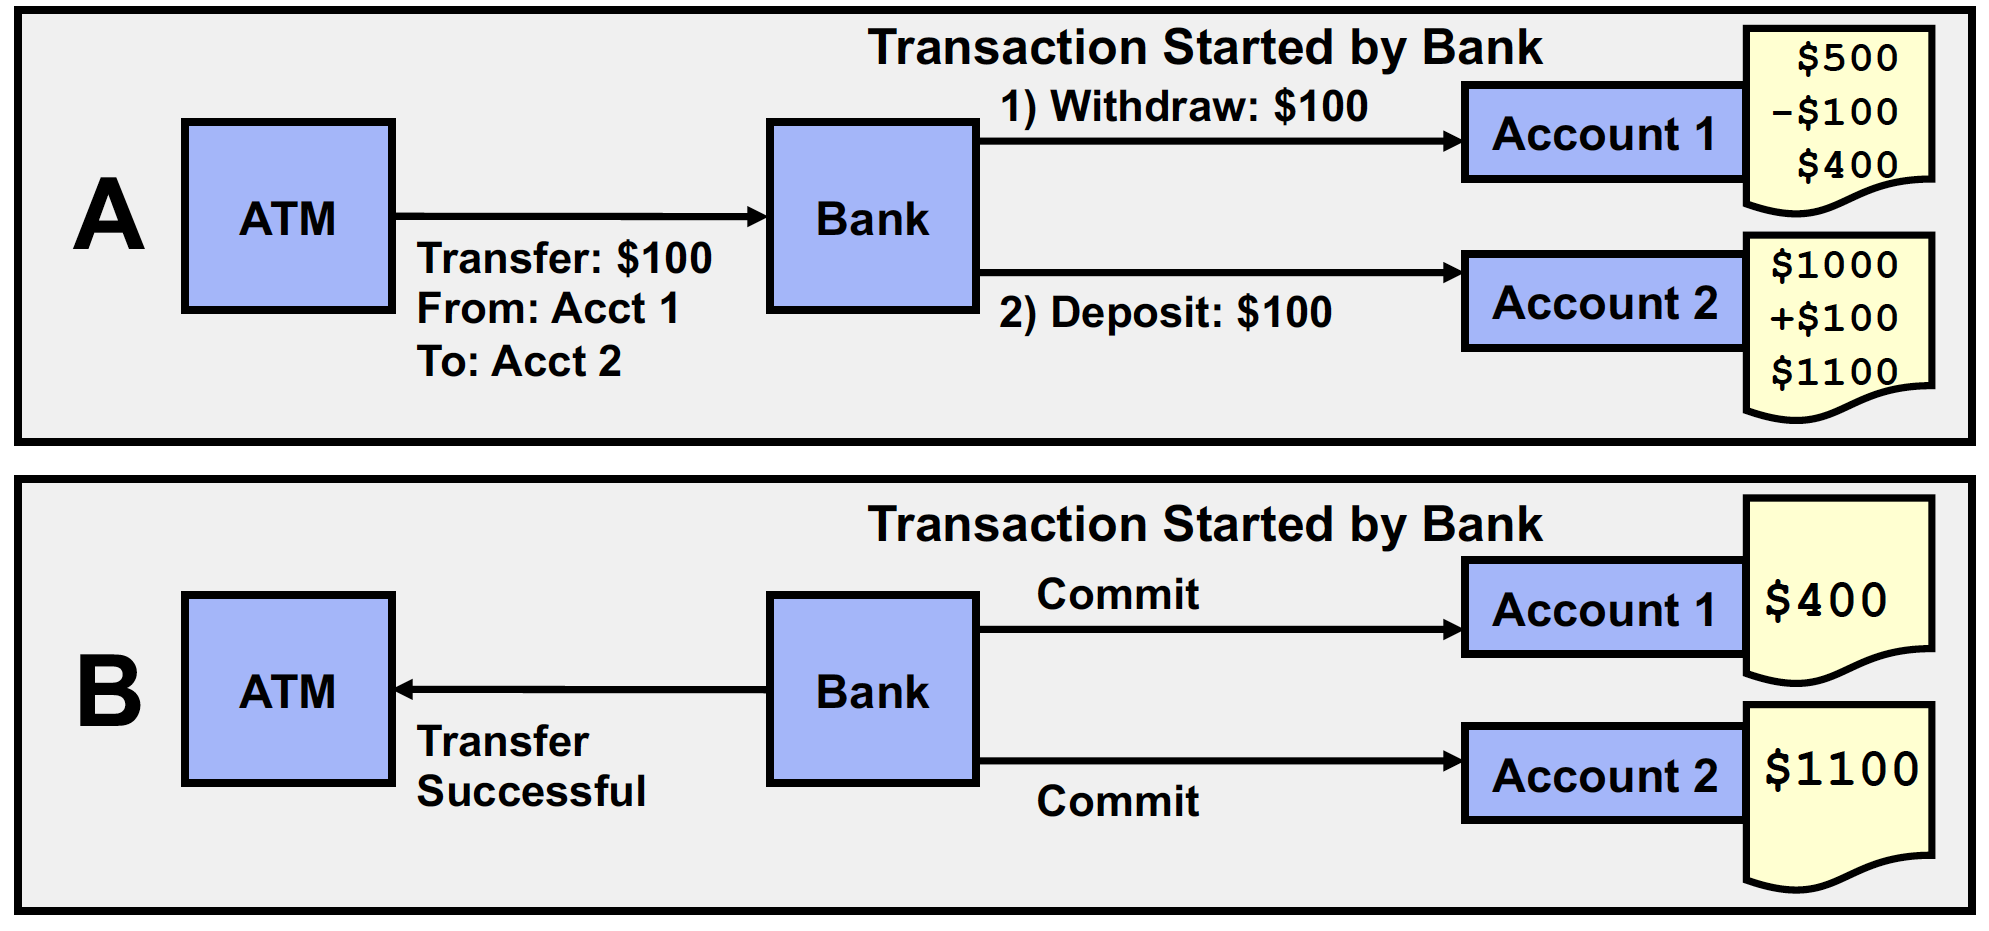
A - Changes within a transaction are buffered.
B - If a transfer is successful, changes are committed (made permanent).

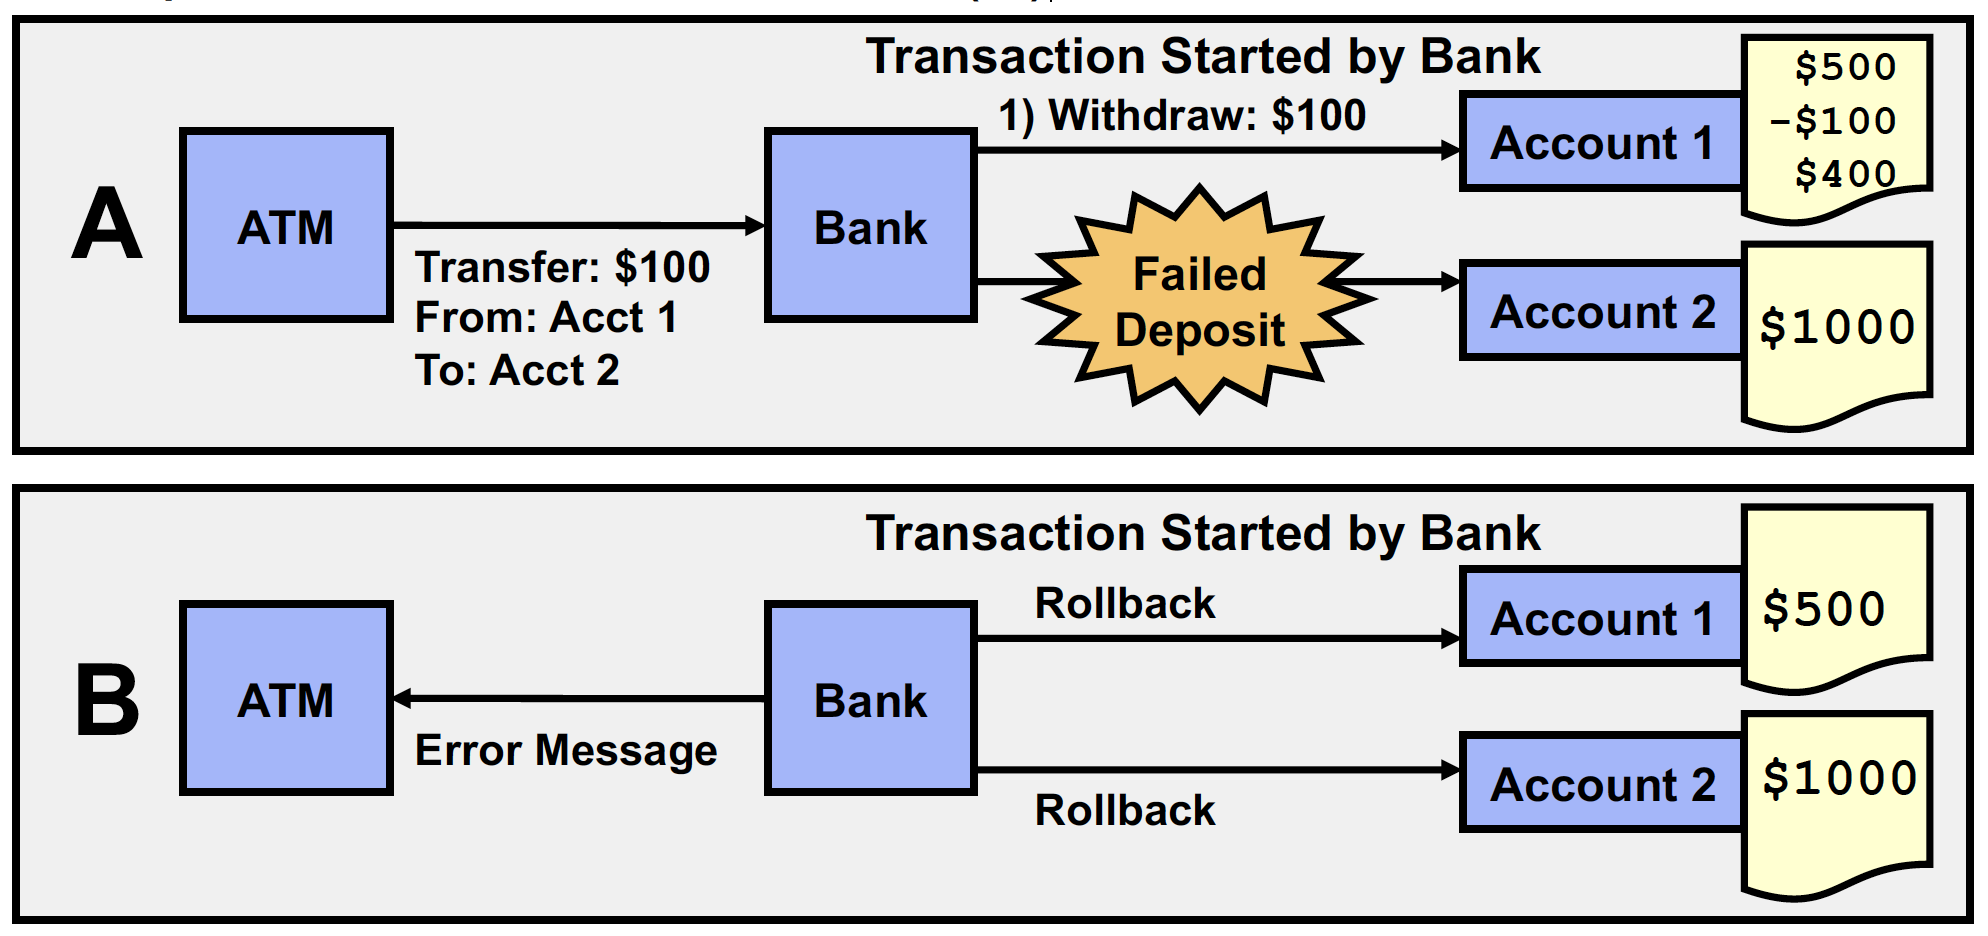
A - Changes within a transaction are buffered.
B - If a problem occurs, the transaction is rolled back to the previous consistent state.
# JDBC Transactions
By default, when a Connection is created, it is in auto-commit mode.
- Each individual SQL statement is treated as a transaction and automatically committed after it is executed.
- To group two or more statements together, you must disable auto-commit mode.
con.setAutoCommit (false); - You must explicitly call the commit method to complete the transaction with the database.
con.commit(); - You can also programmatically roll back transactions in the event of a failure.
con.rollback();
# Bean Validation
- Bean Validation 1.1 in Java EE 7
- Bean Validation 2.0 in Jakarta EE 8
- javax.validation package
- Hibernate Validator
- Custom Validation in all layers vs Standard Validation in Domain Model
- Getting Starting with Bean Validation
- Maven Coordinates
- Junit
- Where to place Validator?
- Jakarta EE 8 API Docs
<dependency> | |
<groupId>org.hibernate.validator</groupId> | |
<artifactId>hibernate-validator</artifactId> | |
<version>7.0.0.Final</version> | |
</dependency> | |
<dependency> | |
<groupId>org.glassfish</groupId> | |
<artifactId>jakarta.el</artifactId> | |
<version>4.0.0</version> | |
</dependency> | |
<dependency> | |
<groupId>org.hibernate.validator</groupId> | |
<artifactId>hibernate-validator-cdi</artifactId> | |
<version>7.0.0.Final</version> | |
</dependency> |
# Built-In Constraints - 1.1
| Constraint | Accepted Types | Description |
|---|---|---|
AssertFalse | Boolean, boolean | The annotated element must be either false or true |
DecimalMax | BigDecimal, BigInteger, CharSequence, byte, short, int, long, and respective wrappers | The element must be greater or lower than the specified value |
Future | Calendar, Date | The annotated element must be a date in the future or in the past |
Max | BigDecimal, BigInteger, byte, short, int, long, and their wrappers | The element must be greater or lower than the specified value |
Null | Object | The annotated element must be null or not |
| Pattern | CharSequence | The element must match the specified regular expression |
| Digits | BigDecimal, BigInteger, CharSequence, byte, short, int, long, and respective wrappers | The annotated element must be a number within accepted range |
| Size | Object[], CharSequence, Collection<?>, Map<?, ?> | The element size must be between the specified boundaries |
# New Constraints - 2.0
| Constraint | Accepted Types | Description |
|---|---|---|
| CharSequence | Checks whether the specified character sequence is a valid email address | |
| NotEmpty | CharSequence, Collection, Map and arrays | Checks whether the annotated element is not null nor empty |
| NotBlank | CharSequence | Checks that the annotated character sequence is not null and the trimmed length is greater than 0. The difference to @NotEmpty is that this constraint can only be applied on character sequences and that trailing white-spaces are ignored. |
Positive | BigDecimal, BigInteger, byte, short, int, long and the respective wrappers of the primitive types | Checks if the element is strictly positive/negative. Zero values are considered invalid. |
PositiveOrZero | BigDecimal, BigInteger, byte, short, int, long and the respective wrappers of the primitive types | Checks if the element is positive/negative or zero. |
PastOrPresent | java.util.Date, java.util.Calendar, java.time.* | Checks whether the annotated date is in the present or in the past/future. |
# Testing
- Maven
- Unit Tests vs Integration Tests
- Unit == Maven Surefire Plugin
- Integration == Maven Failsafe Plugin
# Lab
# Summary
The purpose of this assignment is to refresh on the basics of JDBC, learn the basics of Bean Validation, and to practice these techniques using JUnit test cases.
# Requirements
# Database Setup
No custom database for this lab - but you must pick one of the sample databases to work with. You must grant access to the sample database for your itmd4515 user (see Lab 2 - Setup and Introductory Webapp).
Some MySQL sample databases were installed for you during Week 1. Here are some links to other MySQL sample databases:
- mysql
- chinook
Process
导入方法:
- 方法 1:Workbench
File-Open SQL Script,选择world.sql文件打开,内容全选后,按Execute - 方法 2:终端打开
sakila-db目录或者下载mysql -u root -p < sakila-schema.sqlmysql -u root -p < sakila-data.sqlChinook_Mysql_AutoIncrementPKs.sql大样本数据mysql -u root -p < Chinook_Mysql_AutoIncrementPKs.sqlwc -l Chinook_Mysql_AutoIncrementPKs.sqlgrep -i insert Chinook_Mysql_AutoIncrementPKs.sql
回到 Workbench,给 itmd 账号添加数据库权限, Administration - Users and Privileges ,记得 information_schema 需要 SELECT 权限。
# Project Setup
Create a Java with Maven Java Application project in NetBeans with the following coordinates and configuration:
- Project Name: uid-lab3
- Artifact ID: uid-lab3 (default is fine)
- Group ID: edu.itmd4515.uid
- Version: 1.0-SNAPSHOT (default is fine)
- Use a base package for your Java code of edu.itmd4515.uid
Accept the Lab 3 assignment to create your GitHub repository and configure your projects for source control as documented in Lab 2 - Setup and Introductory Webapp.
Note, this is a Java SE application. It is not a web application.
Deviating from the package convention given above will mean that you can not benefit from Sonar and other automated tools, and I will not be able to fix this. Please follow the specification!
Process
Projects/Source Packages里创建一个新 Java classDriver.javaShell 查看某个数据库,选择某个数据库,按某个字段排列
mysql -u itmd4515 -p
show databases;use world;show tables;desc country;Projects/Dependencies-Add Dependency
Querymysql-connector-java
or
groupId:mysql,
artifactId:mysql-connector-java,
version:8.0.23Build with Dependenciesedit
Projects/Project Files/pom.xml, add<scope>compile</scope>
import java.sql.Connection; | |
import java.sql.DriverManager; | |
import java.sql.PreparedStatement; | |
import java.sql.ResultSet; | |
import java.sql.SQLException; | |
import java.sql.Statement; | |
import java.util.logging.Level; | |
import java.util.logging.Logger; | |
/** | |
* | |
* @author amehime | |
*/ | |
public class Driver { | |
private static final Logger LOG = Logger.getLogger(Driver.class.getName()); | |
public static void main(String ...args) { | |
String url = "jdbc:mysql://localhost:3306/world?zeroDateTimeBehavior=CONVERT_TO_NULL"; | |
String username = "itmd4515"; | |
String password = "itmd4515"; | |
String query = "select * from country where Code = ?"; | |
try(Connection c = DriverManager.getConnection(url, username, password); | |
PreparedStatement ps = c.prepareStatement(query);) { | |
ps.setString(1, "MEX"); | |
ResultSet rs = ps.executeQuery(); | |
while (rs.next()) { | |
LOG.info("data from database: " + rs.getString("Name")); | |
} | |
// prepared statement protects some against SQL Injection | |
ps.setString(1, "drop table country;"); | |
ResultSet rs2 = ps.executeQuery(); | |
while (rs2.next()) { | |
LOG.info("data from database: " + rs2.getString("Name")); | |
} | |
rs.close(); | |
rs2.close(); | |
} catch (SQLException ex) { | |
LOG.log(Level.SEVERE, null, ex); | |
} | |
} | |
} |
# Project Requirements
What database did you select, and which table are you going to represent as a Java POJO? What fields did you select to map from table to Java class? Discuss in your wiki page.
Add the following dependencies to your
pom.xmlusing a scope you feel is appropriate:junit(latest non-beta version of junit 5)Code
<dependency><groupId>org.junit.jupiter</groupId>
<artifactId>junit-jupiter-engine</artifactId>
<version>5.7.0</version>
<scope>test</scope>
</dependency>mysql-connector-java(latest non-beta version of 8)Code
<dependency><groupId>mysql</groupId>
<artifactId>mysql-connector-java</artifactId>
<version>8.0.23</version>
<scope>compile</scope>
</dependency>- Important - build and plugins section. At this time, we need to add specific versions of the maven test plugins for use with JUnit 5. Add the following to your
pom.xml<build><plugins><plugin><groupId>org.apache.maven.plugins</groupId>
<artifactId>maven-surefire-plugin</artifactId>
<version>2.22.2</version>
</plugin><plugin><groupId>org.apache.maven.plugins</groupId>
<artifactId>maven-failsafe-plugin</artifactId>
<version>2.22.2</version>
</plugin></plugins></build>
What scope(s) did you select and why? Discuss in your wiki page.
Follow the Bean Validation Getting Started guide to add Hibernate Validator and dependencies to your
pom.xmlusing a scope you feel is appropriate.
Process
<dependency> | |
<groupId>org.hibernate.validator</groupId> | |
<artifactId>hibernate-validator</artifactId> | |
<version>7.0.0.Final</version> | |
</dependency> | |
<dependency> | |
<groupId>org.glassfish</groupId> | |
<artifactId>jakarta.el</artifactId> | |
<version>4.0.0</version> | |
</dependency> | |
<dependency> | |
<groupId>org.hibernate.validator</groupId> | |
<artifactId>hibernate-validator-cdi</artifactId> | |
<version>7.0.0.Final</version> | |
</dependency> |
In your Lab 3 project, create the following as demonstrated in class:
POJO to represent the structure of a single database table. You can pick any table in your preferred sample database. You do not have to traverse relationships. Keep it simple for this lab.
POJO 代表单个数据库表的结构。你可以选择你喜欢的示例数据库中的任何表。不必遍历关系。对于本练习,请使其保持简单。- Include all required (not null) database columns as fields in your POJO.
- Include a minimum of 2 bean validation constraints in your POJO. These bean validation constraints should relate to database constraints (column length, not null, etc) or type of data (email, string, date, etc)
Process
- 在
Projects/Source Packages新建一个 package,命名为domain,新建一个 Java Class,命名为Customer。 - 修改 NetBeans 配置 - Editor - Formating
Language: Java, Ctegory: Ordering, Insertion Point: Last in Category - Source - Insert Code - Add Property
Name: id , Type: Integer
Name: firstName, Type: String
Name: lastName
Name: email - Source - Insert Code - Constructor (三个,一个无参数,一个全参数,一个排除 id 外的其他参数)
- Source - Insert Code - toString
···
import jakarta.validation.constraints.Email;
import jakarta.validation.constraints.NotBlank;
import jakarta.validation.constraints.NotNull;
import jakarta.validation.constraints.Positive;
···
@NotNull@Positiveprivate Integer id;
@NotBlankprivate String firstName;
@NotBlankprivate String lastName;
@Email@NotBlankprivate String email;
Two JUnit test classes. One should be for testing the validation constraints in your POJO, and the other for testing JDBC CRUD operations.
Make appropriate use of test fixtures, as discussed in class.
Make appropriate use of helper methods to extract and parameterize functionality - DRY (Don't repeat yourself)
In your validation test class, include at least 2 test methods proving your bean validation constraints work
In your JDBC test class, include a test method for each of the 4 CRUD operations (Create, Read, Update, Delete).
I recommend you consider inserting a row for testing purposes in the @Before test fixture, and removing it in the @After test fixture. By following that pattern, your test cases will always be testing a consistent database row, and will be completely separate from the "actual" data in the tables themselves.
I will be running your projects using maven, so make sure not to deviate from database name, username and password conventions outlined in our initial setup.
Process
- 在
Projects/Test Packages下新建两个 Java ClassCustomerValidationTest和CustomerJDBCTest
CustomerValidationTest import domian.Customer;
import jakarta.validation.ConstraintViolation;
import jakarta.validation.Validation;
import jakarta.validation.Validator;
import jakarta.validation.ValidatorFactory;
import java.util.Set;
import org.junit.jupiter.api.AfterAll;
import org.junit.jupiter.api.AfterEach;
import org.junit.jupiter.api.BeforeAll;
import org.junit.jupiter.api.BeforeEach;
import org.junit.jupiter.api.Test;
import static org.junit.jupiter.api.Assertions.*;
public class CustomerValidationTest {
// 1. beforeAll// 2. beforeEach// 3. test1// 4. afterEach// 5. beforeEach// 6. test2// 7. afterEach// 8. afterAllprivate static Validator validator;
@BeforeAllpublic static void beforeAll() {
ValidatorFactory factory = Validation.buildDefaultValidatorFactory();
validator = factory.getValidator();
}@AfterAllpublic static void afterAll() {
// if validator were not auto-closeable, we should close it here}@BeforeEachpublic void beforeEach() {
}@AfterEachpublic void afterEach() {
}@Testpublic void customerInvalidEmail_expectFailure() {
Customer c = new Customer(1, "Customer", "One", "customercustomer.net");
Set<ConstraintViolation<Customer>> constraintViolations = validator.validate(c);
assertTrue(constraintViolations.size() == 1);
assertEquals(1, constraintViolations.size());
assertFalse(constraintViolations.isEmpty());
for (ConstraintViolation<Customer> problem : constraintViolations) {
System.out.println(problem.toString());
}}@Testpublic void customerIsCompletelyValid_expectPass() {
Customer c = new Customer(1, "Customer", "One", "customer@customer.net");
Set<ConstraintViolation<Customer>> constraintViolations = validator.validate(c);
assertTrue(constraintViolations.size() == 0);
assertEquals(0, constraintViolations.size());
assertTrue(constraintViolations.isEmpty());
}}CustomerJDBCTest import domian.Customer;
import java.sql.Connection;
import java.sql.DriverManager;
import java.sql.PreparedStatement;
import java.sql.ResultSet;
import java.sql.SQLException;
import org.junit.jupiter.api.AfterAll;
import org.junit.jupiter.api.AfterEach;
import org.junit.jupiter.api.BeforeAll;
import org.junit.jupiter.api.BeforeEach;
import org.junit.jupiter.api.Test;
import static org.junit.jupiter.api.Assertions.*;
public class CustomerJDBCTest {
private Connection connection;
// helper utility methods - to help us DRY (don't repeat yourself, at least// not in your code. Repeat yourself all you want in your speechprivate Connection getConnection() throws SQLException {
String url = "jdbc:mysql://localhost:3306/Chinook?zeroDateTimeBehavior=CONVERT_TO_NULL";
String username = "itmd4515";
String password = "itmd4515";
return DriverManager.getConnection(url, username, password);
}private void createACustomer(Customer c) throws SQLException {
String INSERT_SQL = "insert into Customer "
+ "(CustomerId, FirstName, LastName, Email) "
+ "values (?,?,?,?)";
PreparedStatement ps = connection.prepareStatement(INSERT_SQL);
ps.setInt(1, c.getId());
ps.setString(2, c.getFirstName());
ps.setString(3, c.getLastName());
ps.setString(4, c.getEmail());
ps.executeUpdate();
}// returns either null, or the valid customer found in the databaseprivate Customer findACustomer(Integer id) throws SQLException {
Customer c = null;
String FIND_SQL = "select * from Customer where CustomerId = ?";
PreparedStatement ps = connection.prepareStatement(FIND_SQL);
ps.setInt(1, id);
ResultSet rs = ps.executeQuery();
if(rs.next()){
c = new Customer();
c.setId(rs.getInt("CustomerId"));
c.setFirstName(rs.getString("FirstName"));
c.setLastName(rs.getString("LastName"));
c.setEmail(rs.getString("Email"));
}return c;
}private void readFromDatabaseAfterUpdate(Customer c) throws SQLException {
String UPDATE_SQL = "update Customer set "
+ "FirstName = ?, "
+ "LastName = ?, "
+ "Email = ? "
+ "where CustomerId = ?";
PreparedStatement ps = connection.prepareStatement(UPDATE_SQL);
ps.setString(1, c.getFirstName());
ps.setString(2, c.getLastName());
ps.setString(3, c.getEmail());
ps.setInt(4, c.getId());
ps.executeUpdate();
}private void deleteACustomer(Integer id) throws SQLException {
String DELETE_SQL = "delete from Customer where CustomerId = ?";
PreparedStatement ps = connection.prepareStatement(DELETE_SQL);
ps.setInt(1, id);
ps.executeUpdate();
}@BeforeAllpublic static void beforeAll() {
}@AfterAllpublic static void afterAll() {
}// before each test, you can stage any test data you need to work with// you won't want to rely on the data in the tables, because the next time// you run your test, it might be different@BeforeEachpublic void beforeEach() throws SQLException {
connection = getConnection();
Customer c = new Customer(9999, "Mayuri", "Mizuki", "mayuri@lostyu.me");
createACustomer(c);
}// after each test, you can clean up any test data that you staged earlier@AfterEachpublic void afterEach() throws SQLException {
deleteACustomer(9999);
connection.close();
}// testing C R U D//// you never want test methods to depend on one another!// don't create data in the createTest, to test it with the readTest!// test methods should be atomic!@Testpublic void createCustomerTest() throws SQLException {
// this is test data I am staging within this methodCustomer customerToCreate = new Customer(9998, "Test", "Method", "mayuri@lostyu.meu");
createACustomer(customerToCreate);
// now that I've created the customer - I need to find it, and assert// the create was successfulCustomer foundInDatabase = findACustomer(9998);
assertNotNull(foundInDatabase);
assertEquals(customerToCreate.getId(), foundInDatabase.getId());
assertEquals(customerToCreate.getFirstName(), foundInDatabase.getFirstName());
assertEquals(customerToCreate.getLastName(), foundInDatabase.getLastName());
assertEquals(customerToCreate.getEmail(), foundInDatabase.getEmail());
System.out.println(foundInDatabase.toString());
// clean up the data I staged within this methoddeleteACustomer(9998);
}@Testpublic void readCustomerTest() throws SQLException {
Customer readFromDatabase = findACustomer(9999);
assertNotNull(readFromDatabase);
assertEquals(9999, readFromDatabase.getId());
}@Testpublic void updateCustomerTest() throws SQLException {
Customer readFromDatabaseBeforeUpdate = findACustomer(9999);
readFromDatabaseBeforeUpdate.setLastName("Updated Successfully");
readFromDatabaseAfterUpdate(readFromDatabaseBeforeUpdate);
Customer updatedInDatabase = findACustomer(9999);
assertEquals(readFromDatabaseBeforeUpdate.getLastName(),updatedInDatabase.getLastName());
}@Testpublic void deleteCustomerTest() throws SQLException {
// this is test data I am staging within this methodCustomer customerToDelete = new Customer(9998, "Test", "Method", "mayuri@lostyu.me");
createACustomer(customerToDelete);
// now that I've created the customer - I need to delete it, and then// try to re-find it, in order to assert that I can not - and therefore// it has been successfully deleteddeleteACustomer(9998);
Customer tryAndFindDeletedCustomerInDatabase = findACustomer(9998);
assertNull(tryAndFindDeletedCustomerInDatabase);
}}- Run - Test Project
- Shell
cd NetBeansProjects/ls -ltrcd lab3lsmvn clean test
Document Lab 3 execution in your wiki page by taking a screenshot of your NetBeans Test Results window (the red/yellow/green stoplight view shown in class). Discuss any other issues or insights you had with Lab 3.
Test your Java SE project on the command line using maven. Document your experience (with code block output) on your wiki page, and discuss how command line Java relates to Maven (hint - think classpath and dependencies). What would you need to do (step by step) in order to run your project without maven, using only the Java SE provided java and javac binaries? In what ways does Maven help us?
Submit to Blackboard
- Right click your uid-lab3project and select
Clean - Go to your NetBeans Projects directory. Create a zip file of the uid-lab3 folder named (you guessed it) uid-lab3.zip. Submit that zip file to the Blackboard assignment.
- Right click your uid-lab3project and select